Saturday, December 31, 2011

Slow-Cooker Crab Meat Fondue

This is a favorite among just about all of us here at home.  Me because of my  un-denying love of cream cheese, which can go un-noticed by no one I am sure, and my husband and children for the finely shredded crab meat that is throughout it.  I can generally guarantee that if it swims, then they will eat it.  So, here we have a win-win for everyone. 

1 stick- 1/2 cup of real butter (softened)
1- 8oz. brick of cream cheese (softened)
2 T. of Worcestershire sauce
2 T. of snipped chives (I use dried)
1- 6oz. can of shredded crab meat (drained, but not squeezed dry)
2 T. of all-purpose flour

-In a medium saucepan over low heat, melt and whisk the first 4 ingredients together.  Once they are thoroughly combined, stir in the crab meat and then follow with the flour.  Transfer to a mini slow-cooker (mine is a Crock-Pot Little Dipper) or a warmed fondue pot, cover and plug in (these slow-cookers usually do not have a setting, but if it did it would be set on Warm or Low, whatever being the lowest setting would be).  Serve warm with assorted crackers or cubed French bread.  Serves 4-6.  Enjoy!

Tiramisu Trifle

And then She said to let there be light.  And before them, with angels singing in unison, shining like a beacon of fluffy liquor goodness, was this glass trifle of layered Tiramisu.  And they all wept through their smiles of joy.

1- 5.1oz. box of INSTANT vanilla pudding mix
6 cups of milk (divided)
1- 5.1oz. box of INSTANT chocolate pudding mix
1- 8oz. tub of mascarpone Italian sweet cream cheese (softened)
6 cups of cool whip (thawed)
1 standard-size dark chocolate candy bar (I used a Hershey's dark chocolate bar-minced)
1 cup of extra strong brewed coffee (I actually brewed mine and let it sit on the burner warming for about 2 hours before I used it-I wanted to make sure that it was super strong and stood out in the dessert)
5 T. of Malibu Coconut Rum (divided)
1- 12oz. package of ladyfingers or Italian biscuit cookies (I used Stella D'oro Margherite Cookies)
dash of un-sweetened cocoa powder

-  In a large mixing bowl, whisk together the vanilla pudding mix with 3 cups of the milk for about 2 minutes.  Then in another separate large mixing bowl, repeat that process with the chocolate pudding mix and the remaining 3 cups of milk.  Cover both bowls and chill for at least a 1/2 hour to set up properly.  Using a hand mixer on low, blend the mascarpone cheese into the vanilla pudding, making sure to thoroughly combine them, then follow in with 3 cups of the cool whip and blend well again; set aside.  Remove the beaters from your mixer and rinse and dry them well to return them back to the mixer.  Using the hand mixer on low again, blend the chocolate pudding with the remaining 3 cups of cool whip, then blend in 2 tablespoons of the coconut rum; set aside.  In a coffee cup, stir together the hot coffee (needs to be warm to take hold of the liquor) and the remaining 3 tablespoons of coconut rum.  Then dip the lady fingers 1 end at a time (working with them in batches of about 6.  you want to dip them as you layer them in-no pre-dipping-go quickly or else they will literally fall apart in about 2 seconds!) and lay them out in a single layer across the bottom of your glass trifle dish.  Next, spoon 1/3 of the vanilla pudding mixture over it (I do a big huge mountain right in the center, then slightly swirl the dish around on the counter to let it even out and kind of fall naturally to the edges).  Sprinkle a light layer of the minced dark chocolate over it.  Follow with a layer of 1/2 of the chocolate rum pudding mixture (again piling it in the center and swirling the dish to let it even out).  Then just repeat these layers again, ending with a third layer of lady fingers with the last layer on the very top being the vanilla pudding mixture.  Sprinkle it with a dusting of cocoa powder and the remainder of the minced dark chocolate.  Place wooden toothpicks in about half way all over the top, then cover with saran wrap (the toothpicks keep the saran wrap from sticking to the top of the trifle and ruining the presentation-makes sure to remove them prior to serving though).  Serves 6-8.  Enjoy!

Thursday, December 29, 2011

Broccoli and Cheddar Stuffed Chicken Pockets

Talk about making a statement at dinner alright.  This deliciously gorgeous dish looks much more difficult than for which it really is.  It is a great simple way to combine the main part of the meal with the vegetable side.  Taking only about ten or so minutes to assemble, using only a few basic ingredients and baking for about the length of time it takes to whip up some homemade mashed potatoes.  And there you have, a five-star meal for a family on a budget in the nick of time.  Perfect. 

3 large chicken breasts (about 2 lbs. worth)
2 cups of fresh broccoli (chopped and steamed)
1 cup of shredded mild cheddar cheese
4 T. of grated Parmesan cheese
1 T. of real butter (diced into 6 pieces)
sea salt and fresh cracked pepper
1 recipe of my Mashed Potatoes

-Preheat your oven to 400*.  Grease a 9x13" baking dish well; set aside.  Using a non-porous cutting board (meaning not a wooden one) and a sharp serrated knife, cut each chicken breast in half width wise.  Then working in the center of the cut edge, carefully insert your knife and slowly cut open a pocket without cutting through the sides or the bottom; alternate stuffing it with a pinch of cheese and about 3 broccoli florets.  Lay the stuffed chicken pockets out in your greased baking dish, making sure they do not touch each other.  Sprinkle the tops with some Parmesan cheese, salt and pepper.  Then place a dot of butter on top.  Bake at 400* for about 30 minutes, then increase your oven temperature up to 450* and bake for about 5-10 minutes more (watching carefully) or until the chicken is done and begins to slightly brown on top.  Serves 4-6.  Enjoy!

Friday, December 23, 2011

Pecan Bars

Here is a great way to feed your hankering for some pecan pie without all of the work.  These little goodies are fantastic for a couple of reasons.  First, because they are ridiculously simple and quick to make.  I think that I spend more time setting up for them rather than what little time I actually spend on making them.  Oh, and let's not be hasty and forget about the fact that there is little to no clean-up for them once they are done baking.  Just merely fold up the foil and toss it into the trash.  Second, because they make more than enough for everyone.  And if you do not need a large amount, you can easily cut this recipe in half without having to whip out your calculator.  Last but not least, third because they are a delicious crowd pleaser everywhere that I have ever taken them too.  And to be honest, I have been making these for going on maybe twelve years now.  That is a lot of Christmas parties filled with satisfied sticky fingered samplers.

2 packages of graham crackers (broke down into individual rectangles)
2 cups of real un-salted butter
2 cups of light brown sugar (packed)
2 cups of pecans (chopped-or smashed inside of a ziploc bag using your sons toy wooden hammer like I do)

-Preheat your oven to 350*.  Line two baking sheets with aluminum foil.  Line them with the graham crackers, one smack up next to the other (if you only fill a portion of the second baking sheet up with the remaining graham crackers-that's ok- just fold up the foil to create a make-shift wall to 'shorten' the pan like I do); set aside.  In a medium saucepan over medium-high heat, melt the butter.  Stir in the brown sugar, slightly increase the heat to about high and bring it to a good strong boil, while constantly stirring it.  Boil for 2-3 minutes or just until it begins to caramelize and look all bubbly and frothy.  Then stir in the pecans.  Using a soup ladle, spoon this mixture over your graham cracker lined foil-covered baking sheets and bake for 10 minutes.  Remove them from the oven and leave to stand and cool completely before cutting them to separate the individual rectangles.  Serves many.  Enjoy!

Butterscotch Blondies

I have a butterscotch lover in our home, that would be my husband Rich.  He absolutely loves anything and everything that is made with butterscotch.  And that leaves a slim window to work within, since there is not much at the market to pick from.  Basically you can get butterscotch pudding or butterscotch ice cream topping and that's about it for the selection.  So, this left me to get creative and find somewhere to put it in with my holiday baking for him.  Santa's gotta have his favorite cookies, right?  I have always seen the butterscotch chips in the baking isle, but never really knew what to do with them.  So, I figured that I would just throw something together that was simple, easy and right up his alley.  And these butterscotch blondie bars are just that.

14 T. of real un-salted butter (1 and 3/4 sticks)
1 cup of light brown sugar (packed)
1/3 cup of sugar
2 eggs (that have stood at room temperature for at least 20 minutes)
2 cups of all-purpose flour
1 tsp. of baking soda
4 dashes of salt
1- 11oz. package of butterscotch chips

-Preheat your oven to 350*.  Grease a 9x13" baking dish; set aside.  Using an electric hand-mixer in a large mixing bowl, cream the butter and both sugars together.  Once it is nice and creamy, beat in the eggs, one at a time.  In another small mixing bowl, combine the flour, baking soda and the salt.  Add this to the butter mixture in small batches, making sure to thoroughly combine it before the next addition.  Then just fold in the butterscotch chips, spread out in your greased baking dish and bake for 30 minutes.  Makes 30 bars.  Enjoy!

Thursday, December 22, 2011

Chocolate Bark Crunch

Now this one here, this is my most favorite holiday time treat.  To me there is not too much that I can rank up any higher than some smooth semi-sweet chocolate that is peppered throughout with little bits of roasted peanuts and specks of salty pretzels.  Paired up with anyone of my personal favorite wines and I am somewhere past cloud 9, out further floating between 10 and 11 I think.

14- 1oz. squares of semi-sweet baking chocolate
1/3 cup of roasted peanuts
1/2 cup of pretzel sticks

First and foremost, line a large baking sheet with waxed paper (the larger the pan-the thinner the bark); set aside. Technically you can use a double-boiler for this recipe, but since I have never owned or used one, this recipe will be wrote for those of us without one. Place a medium sauce pan, that is filled 1/3 of the way with water, over a medium-high flame on your stove top. Place a small sauce pan inside of it so that it floats in the water-not touching the bottom and has no water inside of it-the little saucepan. Place the chocolate squares into the dry, floating little saucepan. Using a wooden spoon, continue to constantly stir the chocolate as it begins to melt (you cannot save melted chocolate once it has begun to burn-it ruins all of it). Meanwhile, place a large handful of peanuts inside of a ziploc sandwich baggy; seal well. Making sure to work over a wooden cutting board, smash up the peanuts into small shards with a rubber mallet, meat tenderizer, un-opened canned good, rolling pin or like me with a toy wooden hammer from your kids room ;)  Repeat this process for the pretzels as well.  Once the chocolate has completely melted through, stir in the peanuts and pretzels. Quickly pour the mixture onto the center of your wax paper-lined baking sheet and spread it out evenly across the bottom of the pan. Place the entire pan into your fridge to set up and chill for about an hour. Once it is completely hard, you can remove it by lifting up on each side of the waxed paper. Using your hands, break it apart into palm-sized hunks and store in an air tight container. Serves 10. Enjoy!

Peppermint Chocolate Bark

My 5 year old daughter, Paige Leigh, is my sole inspiration on this delicious holiday treat.  She absolutely loves peppermint-almost to a point of it being borderline unhealthy.  And since I traditionally make chocolate bark for Christmas Day, I thought that not only would she completely adore this special little indulgence made especially just for her, but she would also love the simple process of making it together with me as well.  She is a born kitchen fairy just like her Momma.  As soon as the holiday season begins to roll in, she is on high alert at the store for the presence of the old-fashioned candy canes, packed neatly in their open-front red boxes.  The good old red and white striped, hooked stick of peppermint hard candy-that never quite make it for more than a few days on our tree.

1- 12oz. bag of Nestle Toll House Semi-Sweet Chocolate Chips
2 T. of canola oil
1 standard-sized peppermint candy cane

-First and foremost, line a large baking sheet with waxed paper (the larger the pan-the thinner the bark); set aside. Technically you can use a double-boiler for this recipe, but since I have never owned or used one, this recipe will be wrote for those of us without one.  Place a medium sauce pan, that is filled 1/3 of the way with water, over a medium-high flame on your stove top.  Place a small sauce pan inside of it so that it floats in the water-not touching the bottom and has no water inside of it-the little saucepan.  Pour the chocolate chips and canola oil into the dry, floating little saucepan.  Using a wooden spoon, continue to constantly stir the chocolate as it begins to melt (you cannot save melted chocolate once it has begun to burn-it ruins all of it).  Meanwhile, remove the wrapper from the candy cane and place the candy cane inside of a ziploc sandwich baggy; seal well.  Making sure to work over a wooden cutting board, smash up the candy cane into small shards with a rubber mallet, meat tenderizer, un-opened canned good, rolling pin or like me with a toy wooden hammer from your kids room ;)  Once the chocolate has completely melted through, stir in the crushed candy cane.  Quickly pour the mixture onto the center of your wax paper-lined baking sheet and spread it out evenly across the bottom of the pan.  Place the entire pan into your fridge to set up and chill for about an hour.  Once it is completely hard, you can remove it by lifting up on each side of the waxed paper.  Using your hands, break it apart into palm-sized hunks and store in an air tight container.  Serves 10.  Enjoy!

Wednesday, December 21, 2011

Slow-Cooker Winter Spiced Red Wine

One of my most favorite holiday-time traditions is one that my husband, Rich, and I have created without even realizing it.  Every year at Christmas time we go wine tasting out west of us in Utica, IL and cap the night off with a gorgeous dinner at a gorgeous place, the Starved Rock Lodge.  This is our third year running with it now, and it really is something that we both enjoy- I because my palate has changed since having children and I am a professional wine taster now and he because it makes me happy.  Not to brag, but I do know my wine.  Over the years of road tripping together to one family destination or another, we have started stopping at wineries along the way to break up the car time.  And I love it.  And my husband loves it because I love it, well let's just say that I am much sweeter with each sip.  But, anyways, to make this long drawn out story a little quicker, I will get back on track here.  We always start off our Christmas Wine Run as I call it, with the stop at the August Hill Wine Bar right in the down town district of Utica- all 1, maybe, 2 blocks of it.  And this is where I learned of this.  They had a heated coffee pot of this spiced red wine going on the bar top.  And once the bartender stated that this was a free additional tasting that did not count in for the 6 you purchase, I was all in.  Out of the four of us that night, I was the first to sample it.  And I was blown away by how much I enjoyed it.  Since this was the first wine bar on our list, I was confident in my liking of it and was eager to create my own version by using a regular store-bought cider spice mixture rather than purchasing their own mixture for $8.00.  And boy oh boy am I ever hooked.  It is like Christmas in a cup to me.  And if your palate is as mine, it will be to you too.

1 bottle of your favorite red wine (I used Vignoles by August Hill Winery-it's a semi-sweet red)
1/2 of a wine bottle of water
1- 5.65oz. carton of Aspen Mulling Cider Spice (or any other brand cider spice mixture to use for spiced apple cider)

-Stir all ingredients together in your slow-cooker.  Set it to go low and slow.  Serve warm, once it has been heated through.  Serves as many as you allow ;)

Tuesday, December 13, 2011

Cheddar Stuffed-Horseradish Burger

This is one darn good burger.  It has a great smokey flavor that comes from the smoked sea salt, which I received as a gift and am enjoying it in and on everything that I am doing lately.  It is probably one of the key main ingredients in this recipe, because it just adds so much more flavor and depth to the burger that can only be otherwise given by using a smoker-which I do not have.  And let's not skip the revue of the thick oozing goodness of the cheddar cheese, which is stuffed inside the center and is merely waiting to escape with that first bite.  Who is not a fan of anything that is stuffed with cheese I ask?  Not many I suppose.  At least not anyone around this homestead.  Then last, but not least is my most favorite part.  The horseradish sauce.  Which is the icing on my cake for sure.

1/2 cup of sour cream
5 tsp. of horseradish
1 tsp. of Dijon mustard
1 1/2 lbs. of 80/20 ground chuck
1/2 tsp. of smoked sea salt
fresh cracked pepper
2 tsp. of Worcestershire sauce
4 slices of deli-cut mild cheddar cheese (folded in 1/2, then in 1/2 again)
egg hamburger buns (found in your grocer's bakery)

-Preheat your grill to a high flame.  In a small mixing bowl, stir together the sour cream, horseradish and the Dijon mustard, cover and refrigerate until ready to use.  Then, in a large mixing bowl, using your hands, combine the ground chuck, smoked sea salt, cracked pepper and Worcestershire sauce well.  Split it into 8 equal sized hunks, shape them each into a smooth ball and then flatten them into thin large round patties.  Place a folded piece of cheese in the center of 4 of the patties, place the other 4 patties over them to create 4 double burgers then just pinch the edges together to seal in the cheese.  Toss them on the top rack of your grill for about 7 minutes on each side for a MW burger- DO NOT use the spatula to flatten them down while grilling-they may pop and you could lose your cheese! (I usually am a MR-M girl on my burgers, but have found when I stuff them with cheese that I do not like them to be too undercooked) Toss them on an egg bun with a heavy smear of my horseradish sauce and maybe a pickle or two.  Serves 4.  Enjoy!

Wednesday, December 7, 2011

Grilled Garlic-Lime Chicken

This is a fantastic way to do up some chicken.  I love how the outside grills up so nice from the little bit of extra virgin olive oil, it really helps create a beautiful coloring on the chicken.  It also helps sear in all the juices so that the chicken stays perfectly moist throughout the inside.  And lets not overlook the fact that this chicken is extremely versatile, it can be eaten alone with a potato, chopped up in a salad, as a sandwich, diced up for nachos or even a burrito.  The possibilities are endless and all up to you.  No matter what you do with it, it will stand out above the rest with it's delicious flavoring and proper cooking.  Two essentials when it comes to having some chicken for dinner.

zest and juice from 2 large limes
2 T. of extra virgin olive oil
1 tsp. of dried crushed basil
sea salt and lots of fresh cracked pepper
3 small garlic cloves (minced)
4 boneless/ skinless chicken breasts

-Preheat your grill to a medium-high heat.  Combine the lime zest, lime juice, e.v.o., basil, salt, pepper and garlic in a small bowl.  Brush both sides of the chicken with it and toss it onto the top rack of your grill.  Grill for about 10-15 minutes (depending on thickness-mine were super thick and I did 15 minutes), then flip and brush again with the lime oil.  Grill for another 15-20 minutes more, flipping and brushing with lime oil too.  Serves 4.  Enjoy!

Saturday, December 3, 2011

Feta and Tomato Spaghetti

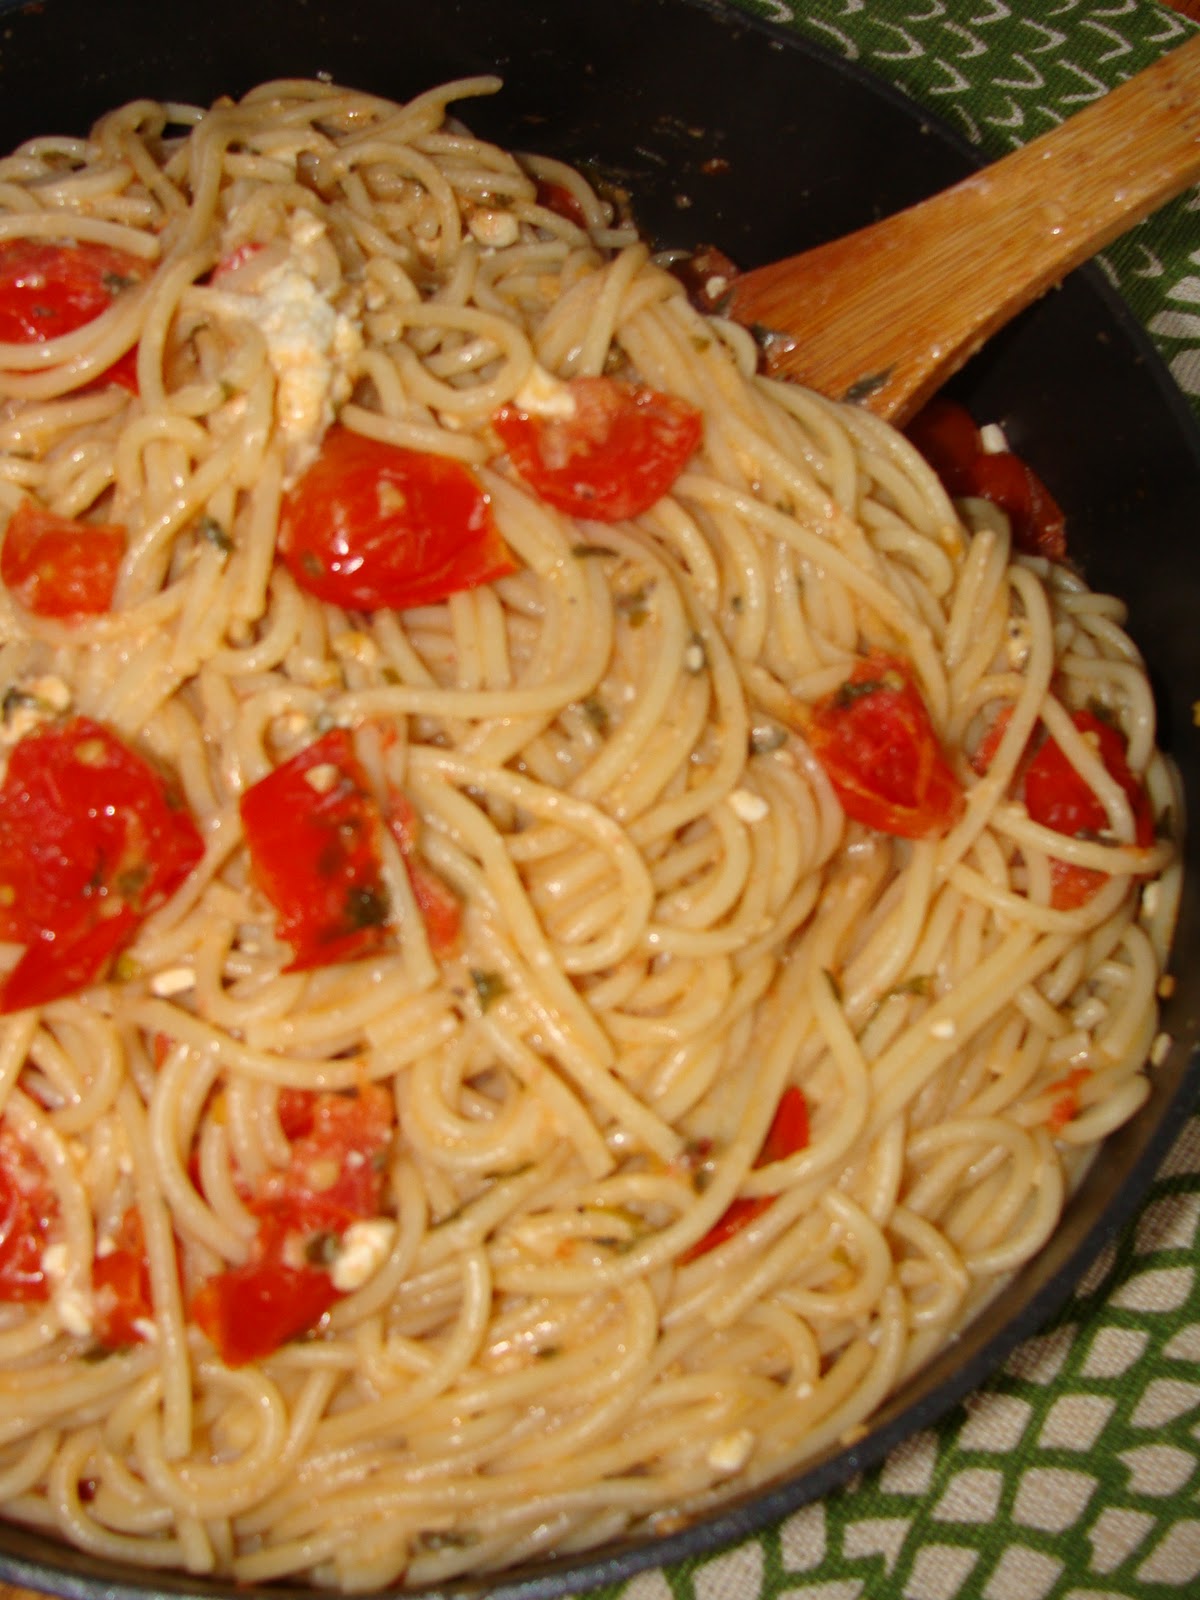
A lot of the times, my recipes stem from little sidetracks of inspirations.  It could be from an advertisement, a magazine cover, overhearing something that my family is watching on the television (you have to nail me down with something tasty and sweet for me to watch on my own free will) or like this one, just from the mere suggestion of a key ingredient.  And that would be the feta.  I had never heard of putting feta cheese in a hot pasta dish.  Don't get me wrong now, I love feta, but have only really had it in or alongside a Greek dish like a Greek Salad.  I love how some Greek restaurants place it along with some Greek olives as a garnish on their plates.  Give me a little drizzle of some Italian or Greek dressing on it and I am in heaven.  But, to put it in a pasta dinner, this was a first for me.  I had actually overheard the cashier at my local market (which I am a faithful shopper of) mention that she saw a recipe somewhere about doing just that, having pasta with feta cheese in it.  So, then I was interested.  Well, to put it bluntly, I was way more than interested, I could not get out of that dang store fast enough to get back to my kitchen table, to my lab top that is, and google up some recipe examples.  And that is just what I did.  For over an hour.  Then I looked at what ingredients that I had on hand here and went to town.  And this my friends, is where it lead.  To this amazingly different, and more than delicious dish.

5 T. of extra virgin olive oil
2 cups of grape tomatoes (sliced in half)
sea salt and fresh cracked pepper
dash of crushed red pepper flakes (more or less to taste)
2 cloves of garlic (minced)
1 T. of fresh basil (chopped)
2 T. of fresh flat-leaf Italian parsley (chopped)
1/4 cup of white wine  (the closest I had was white zinfandel and it was great in it surprisingly)
1 cup of chicken stock
1 lb. of spaghetti pasta (uncooked)
1 small tub of crumbled feta cheese

-Heat up your e.v.o. in a large deep saucepan over medium-high heat.  Once it is good and hot (you will smell the e.v.o. when it is), toss in your tomatoes with a healthy amount of salt, pepper and red pepper.  Saute for about a minute (while constantly stirring), then add in you garlic and fresh herbs.  Once you can smell the garlic (about 20-30 seconds or so) pour in the wine, stir in and scrap with your wooden spoon then add in your chicken stock.  Bring this to a good boil for and hold it for a couple minutes, then reduce the heat some and let it simmer for about 5 minutes.  Meanwhile, for your spaghetti, have a large stockpot of water heated to a rapid boil.  Add in about 1 T. of e.v.o., a dash of salt (this will flavor your pasta and keep it from sticking together), toss in your pasta and boil it for about 9-10 minutes for Au Dente.  Strain the pasta and fold it right into your simmering sauce along with the feta cheese.  Serves 4.  Enjoy!

Friday, December 2, 2011

Almond Joy Cookie Bars

There are a few reasons why I love to make these specific cookies.  One and foremost, is because of my new passion, toasted coconut.  I am in love with it.  And I want it all of the time, basically on everything sweet from here on out.  I would have to call it my taste of the season for now.  There is probably a white layered coconut cake coming soon out of this current shear obsession, but anyways back to this recipe.  Two and because I am an overly practical person, is the fact that it makes so many cookies, and because they are nice and thick, they go further.  What can I say, I'm a stretcher of just about anything, including and maybe most particularly food.  And third, because no one else in the house is as crazy about coconut as I currently am.  So, basically in other words, they are all mine.

2 1/4 cups of all-purpose flour
1 tsp. of baking soda
1 tsp. of salt
1 cup of real un-salted butter (melted)
3/4 cup of sugar
3/4 cup of light brown sugar
1/2 tsp. of real vanilla extract
1/2 tsp. of almond extract
2 eggs (at room temperature)
2 cups of semi-sweet chocolate chips
2/3 cup of sliced almonds
2/3 cup of shredded baking coconut

-Preheat your oven to 350*.  In a small bowl, stir together the flour, baking soda and the salt; set to the side.  In a large mixing bowl, whisk together the melted butter, sugar, brown sugar, vanilla extract, almond extract and the eggs.  Working in small batches, stir the flour mixture into the butter mixture, making sure to completely combine each addition before adding in the next.  Then stir in the chocolate chips and the almonds.  Spread this out evenly in a greased 9x13" baking pan and sprinkle the top with the coconut shavings.  Bake for 25 minutes (making sure not to let the edges become too dark).  Let stand and cool completely before cutting.  Makes 30 or more cookie bars.  Enjoy!